
Polymer Clay Flower Tutorial
We're going to make a purple flower in this polymer clay tutorial using Papa's Clay. These flowers are great for adding details and other embellishments to projects and also great for polymer clay jewelry and polymer clay earrings.
Here's what you will need to get started:
- Lilac Papa's Clay
- Kiwi Green Papa's Clay or Green Papa's Clay
- A pasta machine, roller, or other rolling tool
- X-ACTO knife or sharp blade
- Chalk pastels (optional)
If you don't have any of these tools, it's okay, you can use all sorts of things you have lying around the house like toothpicks, needles, pens, etc.
Step 1 - Condition the Clay
Papa's Clay conditions differently than other types of clay. It just needs some gentle rolling and heat from your hands. Make sure to condition your clay before you start working with it. Small pieces take just a few seconds to condition and big pieces can take up to a minute or two. You can use a hair dryer to condition it even quicker. Your scrap pieces should be pretty quick to condition, but you might need a bit longer depending on how much white clay you need.
Step 2 - Roll your clay in the pasta machine
Papa's clay can be used in a Pasta Machine or a roller. It just needs to be conditioned first. If your clay is crumbly in the pasta machine then it just needs to be conditioned.
If you have a pasta machine, that's going to be the most convenient and quick way to roll your clay into a polymer clay slab. But, you can use a hand roller or even a rolling pin to roll out your clay.
Roll your clay into a nice, thin slab. We set our pasta machine to size 2.
Step 3 - Cut out flower petals
If you have some little cutout tools, that will help you easily cut out shapes that are all the same size. If you don't have any cutout tools, then you can try to free hand cutting out pieces of clay to get in the same shape. Or you can try to make your own cut out tools or patterns.
Cut out four pieces to make one flower.

Step 4 - Thin out the flower petals
Even though your polymer clay petals will be pretty thin after rolling them, we want to get them even thinner and give them some petal like properties. The easiest way to thin out your clay even more is to use a large, heavy ball stylus, but you can use your fingers if you don't have that tool.
Take one of the petals you cut out earlier, and put it in your palm. Then take the bally stylus and roll out the clay into a thinner ellipse type shape. Or, use your finger to roll out the clay.

If you don't have a second, smaller stylus, you can use a dried out ball point pen. Use the second stylus and gently roll it up and down the polymer clay flower petal.
This will help add some lines and tiny details to your petal. Small details will make a huge impact on your polymer clay projects.

Step 5 - Add some tiny tears to the tip of your flower petal
Put your flower petals on your cutting/working surface - do not do this step with the flower petals in your hand.
Make a few very tiny cuts at the end of the flower petal to emulate the tiny imperfections that you would find in a real flower petal.
Step 6 - Combine your petals
Very gently combine your petals into the shape of a cross or an X. The clay flower petals will be very delicate so be very careful with them. As you place the petals, have each petal overlap the one that you set it on top of. After all the petals have been placed gently press down in the middle to combine them.

Step 7 - Add the stem
Take a very small piece of Kiwi Green Papa's Clay or Green Papa's Clay and place it in the middle of the flower petals and use a tool to poke it and and some depth to it.

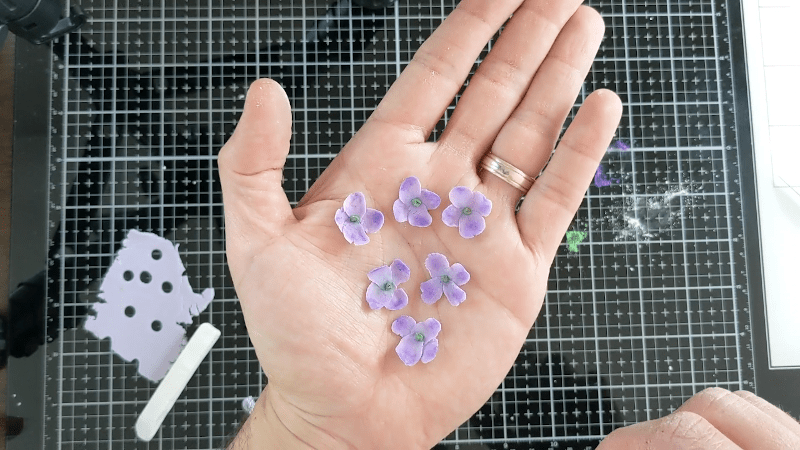
Step 8 - Add some chalk pastels
If you don't have chalk pastels this step is optional. But, adding the additional bit of color will really bring your polymer clay flower to life.
Start with a darker purple color and gently brush it on the tips of your flower petal and the backs of the petals. This is also a great time to very gently curve your petals up a bit so they look like they have some additional shape.
Then, add either some white chalk pastels to the inside of the petals. Finally, add some green chalk pastel to the very center to represent some pollen.
Adding the chalk pastels in that order so that you don't get the wrong colors in the wrong parts of your polymer clay flower.

Step 9 - Bake your Papa's Clay Polymer Clay Flower
Bake your clay flower at 286F for 15 minutes. We recommend putting your flower on top of a pile of baking soda or corn starch so that it does not get bent or stick to the baking surface.
Check out the video tutorial here: