
Polymer Clay Tutorial - Make a Flower Pot, and Kawaii Version, with Papa's Clay
We're going to make a flower pot and a kawaii flower pot in this polymer clay tutorial using Papa's Clay. This tutorial is great because it is simple, but shows you a few different techniques including how to turn anything into a kawaii version.

Here's what you will need to get started:
- Orange Papa's Clay
- Ochre Papa's Clay
- Red Papa's Clay
- Chocolate Brown Papa's Clay
- Leaf Green Papa's Clay
- A clay cutting tool or knife
- A dotting tool
- A pasta machine, roller, or other rolling tool
- An old toothbrush
If you don't have any of these tools, it's okay, you can use all sorts of things you have lying around the house like toothpicks, needles, pens, etc.
Step 1 - Condition the Clay
Papa's Clay conditions differently than other types of clay. It just needs some gentle rolling and heat from your hands. Make sure to condition your clay before you start working with it. Small pieces take just a few seconds to condition and big pieces can take up to a minute or two. You can use a hair dryer to condition it even quicker. Your scrap pieces should be pretty quick to condition, but you might need a bit longer depending on how much white clay you need.
Step 2 - Mix your clay
Take an even amount of Orange and Ocher and a tiny bit of red. You'll want to make quite a bit more than what we have shown here, but this ratio will get you started. You'll need enough to make at least one flower pot, and then have some extra to roll out for the lip of the flower pot.

Step 2(a) - Roll a cylinder
Take your mixed clay and roll it into a cylinder or tube using your fingers. Once you have an even cylinder, roll one end a bit more so that you have a tapered look.
Using your cutter, cut off the end as evenly as you can. You might need to do a bit of adjusting to get your original shape back after cutting the top and bottom off.
If you're not going to make a kawaii polymer clay pot, then bake the beginning part of your flower pot so that it does not get smashed. Baking polymer clay multiple times throughout your process is a great way to "save" your work and to make sure that it does not get smashed or ruined in subsequent steps.

Step 2(b) - Make a Kawaii Flower Pot
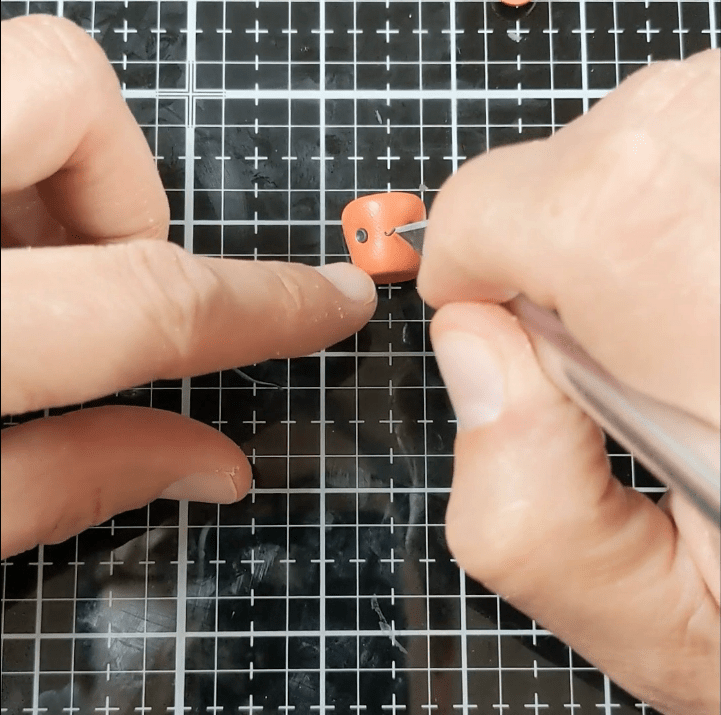
Take a needle tool to mark where you want the eyes to go. Put them a good distance apart so you can put a little mouth in between them and then take a dotting tool and push in the eye sockets.

Take a tiny bit of black polymer clay clay. Cut it into two even parts, then roll it up into two balls and put a ball into each of the eye sockets. Take your ball stylus and push in the black eyes.
Making kawaii mouths out of polymer clay is probably the trickiest step. Take some black Papa's Clay and roll it out as thin as you could possibly get it. Papa's clay is actually really good for this because it does not melt when it gets really thin and hot.
Cut off a small little piece and get it on your exacto knife and use your finger to turn it into a u-shape. Gently place it right between the eyes and adjust as necessary.
Bake your clay flower pot so that is ready for the next step.
Step 3 - Make the flower pot lip
Take the clay that you mixed earlier and run it through your pasta machine, so you get a nice thin sheet.
Put some liquid clay on the top of your flower pot to help the lip stick a lot easier.U
se a cutting blade to cut a nice straight line and then add that to the top of your flower pot. Line up the beginning and the end of your lip and cut off any excess clay and then gently blend the two parts together.
This is another great time to bake your polymer clay so that it does not get smashed in the next steps.

Step 3 - Make the soil
Take some chocolate brown clay and put it on the top of your flower pot and smash it all around and push it in so that all the seams and any open spaces are covered up.
Take an extra toothbrush you have smash the clay in with it so you get a soily, grainy effect. Again, this is a great time to bake it after you do this, so it's easier to do the next step without ruining anything.

Step 4 - Make the leaves and stem
Take some leaf green clay and roll it out into a little thin snake and also take some and run it through your pasta machine. If you have some leaf cutters, they're perfect for cutting out these similar size leaves. If not, no problem at all, just cut some similar sized leave shapes.
So you can take a needle tool or any other tool that you have like that and make some lines so it looks like you have some veins in your leaf. Drag your tool at an angle across the clay so that you are more pressing the clay down then breaking the surface of the clay. If you get little bits of polymer clay coming up, then that means you are breaking the clay instead of pushing it down.
Position one leaf at the top of your stem and add the other leaf right next to it. Use a tool to very lightly blend the leaf and the stem together so they don't break apart.

Bake your stem and leaves.
Step 5 - Add all the pieces together
Use a tiny drill bit to drill a hole right in the middle of your flower pot. Trim the stem so that you get it to your desired length. Then, take your stem, add a bit of super glue, and drop it into the hole.
Take a tiny bit of Chocolate Brown Papa's Clay to cover up anything from the drill and to wrap it around where inserted the stem into the soil. Use your toothbrush to texture the soil.
Bake everything for the last time, and then your polymer clay flower pot using Papa's Clay will be complete.
Check out the video tutorial here: